Page 8 of 9

PostPosted: Thu Apr 01, 2010 8:26 am
by CAVEMAN
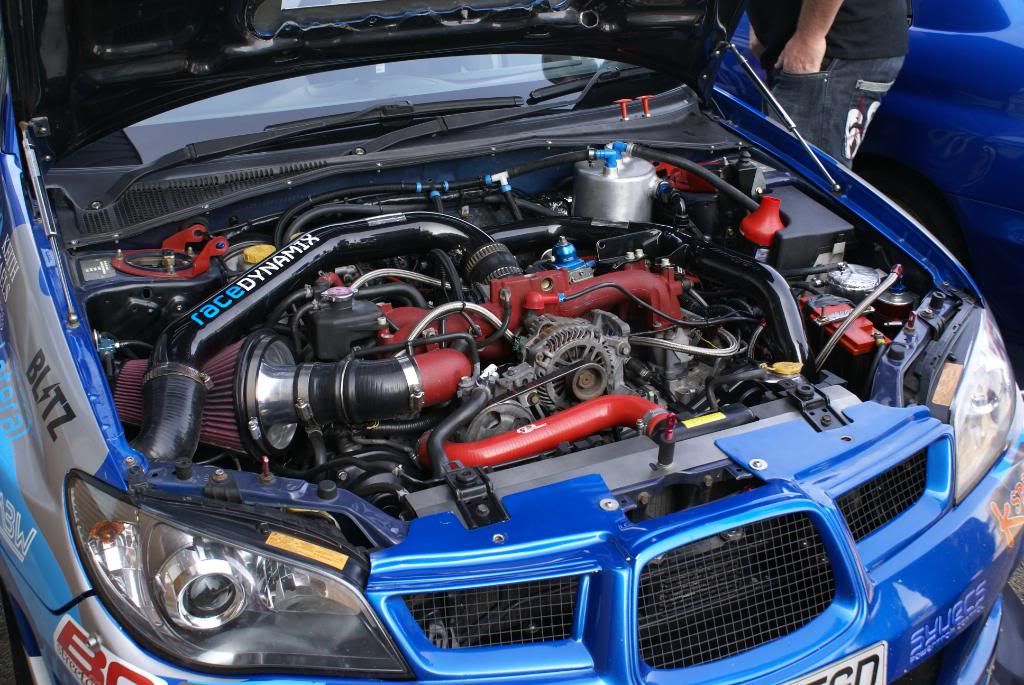
I always took cages from R&D and every single one they fitted for me came with webbings across the main rear bracing and the doors.

For the additional weight the webbing would add - put holes in the middle of the webs too - it increases srtuctural rigidity massively. The cage is for increases torsional stiffness mainly, and safety ofcourse.

This then ties all the body together to get the suspension components to work as they are designed to do - in isolation assuming a 100% rigid body structure.

Then you can take it further and get your roll centres and dynamic roll centres sorted (taking into account your new CoG) with a good geometry set up.

I would assume that now you will need to put that brace back on...otherwise you are putting all the cornering stresses back onto the top of the struts...as the rest of the body will not take it up for you anymore.

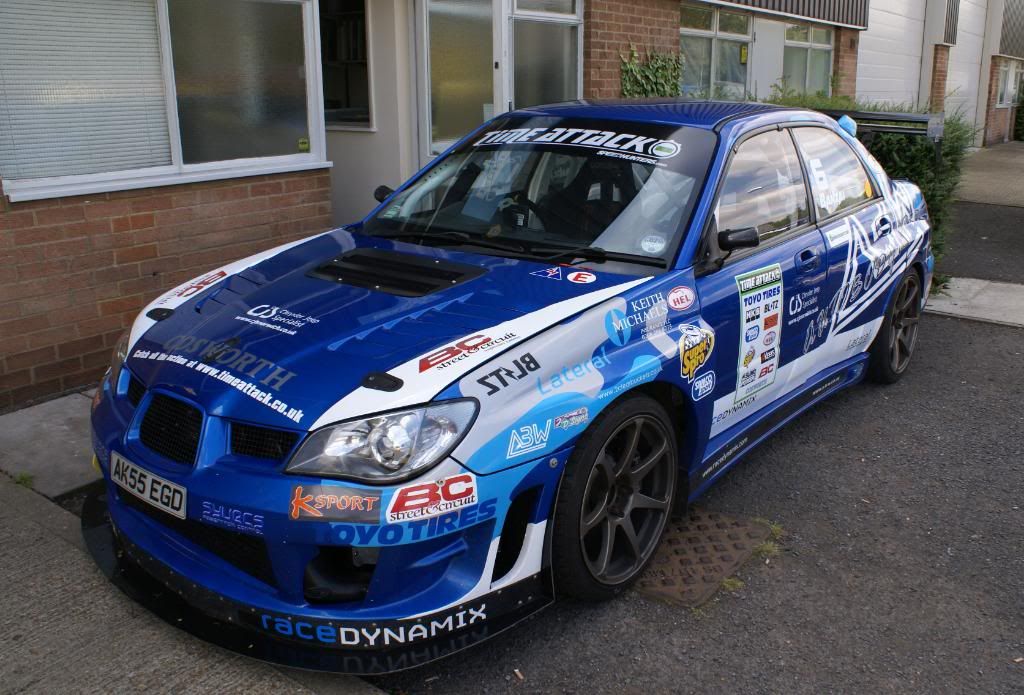
Do a search for the WRC roll cages and see what they have done....they are essentially aiming for the same thing. A theoretical infinately stiff body.

Hats off to you buddy - takes a lot of balls to go that far, and deep pockets too...the more you do, the more you want to do....vicous cycle that is so hard to break!!

PostPosted: Fri Apr 02, 2010 5:28 am
by dynamix
SHP will do webbing if needed - I have no doubts in their abilities and neither do the scrutineers for Time Attack.

As for geometry and roll centre correction - all that will continue to be set up by Zen as we have a good working knowledge of what works and doesnt work on my car and as before will be basing most set up on data from track and pit lane monitoring of the car.

The strut brace will not go back on - there is no room for it with the current dry sump tank location. That is being moved and a custom tank fitted soon but not in time for round 1.

PostPosted: Wed Apr 07, 2010 7:33 pm
by dynamix
Image
Image
Image
Image
Image
Image
Image
Image
Image
Image
Image
Image
Image
Image
Image
Image
Image
Image
Image

PostPosted: Thu Apr 08, 2010 7:45 am
by CAVEMAN
looks brill with the white on blue contrast. Now just for the old school white OZ's!!

Get cracking on routing the fuel and brake lines through the shell now and don't forget to plumb in your fire kit.

Still reckon that front strut brace is needed, but I am sure you will be able to better judge that from the pilot seat!

So much more weight to lose, but as you carry on with this evolution I am sure you will do it bit by bit. What does it weight at now? Whats the distribution like?

So much for your daily driver eh!!!

Good luck again this season mate...hopefully will get to a round when I am back over in UK and cheer you on.

PostPosted: Thu Apr 08, 2010 8:10 am
by dynamix
Cheers

Have been asking about redoing the brake lines and fuel lines but not made my mind up as yet - it may well happen at some point but i have no time to do pre round 1 unfortunately :(

I ran without strut brace at snetterton in October TA and didnt notice a difference at all so will run without one for the moment until I can get the dry sump tank made to sit it lower in the chassis and refit. Alternatively the engine will be dragged out soon at which point I will clean up the engine bay and make a loom for it all to save a chunk more weight. This would be a good point to triangulate the struts to the main roll cage to add more stiffness to the front.

It will still get used on the road but will have to see how bearable it is to drive on the roads before deciding whether to sorn it for track use only.

PostPosted: Thu Apr 08, 2010 9:33 am
by WR 1mposter
Just a question dunc. just look at your website, do you just map o.e ECU, or do you do Solaris Simtek Motec aswell ? ....also no WR1OC on you subaru sites :lol:

PostPosted: Thu Apr 08, 2010 9:40 am
by dynamix
I map:
OE Ecu
Simtek
Solaris (Syvecs)
ESL

and others ...

Will put wr1oc on there later - cheers

PostPosted: Thu Apr 08, 2010 12:22 pm
by CAVEMAN
yeah but you didn't have the cage at Snetterton so the chassis was able to compensate and twist without effecting the front struts much, now with the cage in the chassis will be super rigid, so any flex will now be transferred to the front struts as this is now the weakest point for torsional rigidity. The geometry might move slightly during cornering.

Like you say, see how it goes but I am pretty sure if you ran the chassis through FEA now, the strut tops would be glowing bright red! The sooner you can tie these into your cage the better IMO.

You can lose about 6 or 7kg by trimming your loom back and getting rid of all the excess wires and connectors etc...Also a nice lightweight horn saves a few kg too.

There is also additional weight between the chassis skins too especially in the rear pillars...but thats going to extremes (and wasn't really in the rules either :wink: )

On the upside you have a shit load more room for shopping now the rear bench is out!! Might need a tie down cargo net though!! Wouldn't want to spill anything on your lovely new white paint! :lol:

PostPosted: Thu Apr 08, 2010 12:57 pm
by WR 1mposter
dynamix wrote:I map:
OE Ecu
Simtek
Solaris (Syvecs)
ESL

and others ...

Will put wr1oc on there later - cheers


Simtek :wink: will bear that inmind !

PostPosted: Fri Apr 09, 2010 6:09 am
by dynamix
CAVEMAN wrote:yeah but you didn't have the cage at Snetterton so the chassis was able to compensate and twist without effecting the front struts much, now with the cage in the chassis will be super rigid, so any flex will now be transferred to the front struts as this is now the weakest point for torsional rigidity. The geometry might move slightly during cornering.

Like you say, see how it goes but I am pretty sure if you ran the chassis through FEA now, the strut tops would be glowing bright red! The sooner you can tie these into your cage the better IMO.

You can lose about 6 or 7kg by trimming your loom back and getting rid of all the excess wires and connectors etc...Also a nice lightweight horn saves a few kg too.

There is also additional weight between the chassis skins too especially in the rear pillars...but thats going to extremes (and wasn't really in the rules either :wink: )

On the upside you have a shit load more room for shopping now the rear bench is out!! Might need a tie down cargo net though!! Wouldn't want to spill anything on your lovely new white paint! :lol:


100% agree on the loom - it is on my list although I wont be trimming it back - i would prefer to make a new loom altogether with only the things I need in it. Haven't got time now to do that but the intention is for single twist connector between engine and car looms.

PostPosted: Fri Apr 09, 2010 7:10 am
by CAVEMAN
That would be awesome if you did.
Save you a few kilo's, make it a lot more reliable but more importantly, you then know where each connector for each component is and give you a better understanding of the layout if something went a miss during an event.

Don't under estimate though, just how much a good quality loom with MIL spec connectors could be.

PostPosted: Fri Apr 09, 2010 7:21 am
by CAVEMAN
Dunc, was also thinking about your Snetterton experience.

Not entirely sure what the track layout was, but I know Snetterton is bascially a series of straights with slight right handers, and the average speed is very high...

This maybe why the strut brace was taken off, to give you a bit more flex in the chassis up front and help increase your contact patch.

But thinking theoretically, a brace is a mechanical aid to help the stiffen the body and reduce unwanted flex...or should I say help eliminate any chassis twist that calculations can't handle. What you want ideally is a chassis that does not bend or twist, then you can isolate the suspension, ARB's etc...to throw into the math of your geometry.

So that said...what you achievied was more chassis twist...could you not dial that in with an adjustable anti roll bar and a slight tweak of the damper/spring settings??

In essence you are doing tha same thing, but now you have full control over the amount of twist in your chassis. With an adjustable ARB you would be able to set it up perfectly and keeping your front/rear balance too.

Just a thought mate...but that would be my approach.

PostPosted: Sat Apr 10, 2010 6:01 pm
by dynamix
new switch panel to replace the central dash area ...

Image

PostPosted: Sun Apr 11, 2010 10:32 am
by CAVEMAN
looks fantastic mate.

what you using the adjuster for? brake bias, centre diff (or do you have that kinked into the ecu via motec?), fuel mix/map settings?

very pro looking for sure....nice touch with the switches and make a change from the normal silver toggle ones.

PostPosted: Sat Apr 17, 2010 8:00 am
by dynamix
The adjuster is for map switching on the Solaris/Syvecs ECU.


Image

Hopefully going on wednesday.

PostPosted: Sat Apr 17, 2010 10:30 am
by Foley
dynamix wrote:The adjuster is for map switching on the Solaris/Syvecs ECU.


Image

Hopefully going on wednesday.


That looks well smart 8)

PostPosted: Thu Apr 22, 2010 6:31 am
by dynamix
Done:
- fitted new bonnet
- fitted windscreen
- fitted rear polycarbonate screen
- made dash panel to cover ecu
- both seats in
- extinguisher in and connected
- scuttle tray done
- steering wheel on

Picked up the new doors yesterday afternoon from ABW - they are superbly light and with the glass that arrived yesterday from Plastics4Performance will save me around 100 kilos I reckon.

Set about getting them on the car last night and they are all mounted and just one lock / handle to go before they are complete. :thumb:

Tim is heading over here today to help me the last few bits..

1. fit side windows
2. fit aerocatches
3. fit mirrors
4. oil change
5. wire elec cut out switch

and if time..
1. fit perrin front anti roll bar
2. sort some proper mounts for splitter
3. wire hazards switch

Then I can put some stickers back on it to make it look a bit like it did before and give it a clean.

PostPosted: Mon May 03, 2010 8:44 am
by dynamix
Round 1 was a great learning exercise for me in a new class, a very different car and lots of unfinished (and unchecked) parts.

It went well on the day but the pure number of hours put in on the car (and working/mapping beforehand) meant that it was going to be down to the wire.

Thanks to some awesome help from ABW I had new doors 2 days before the round and windows arrived the same day and with Tim's help got those on the day before setting off to Oulton Park with Julian.

I had not driven the car in the new state til rolling out of the pit lane for warm up and ran low boost to get used to it - it felt great and was immediately 2 seconds quicker than last year's best time even on old tyres that had done the whole of last year's TA season, a trip to the ring, cadwell and lots of road miles. (unfortunately that is all I had tyre wise)

Brakes bled and off out for practice and boost was upped and more time got whilst learning the car and relearning lines - all was good aside from issues with the centre of the new bonnet lifting (cured with some tape) and windows bowing out (again tape to the rescue)

Qualifying and I couldn't stop locking the brakes under braking and i felt the car lacking in normal power and increased noise but put it down to lack of interior and vowed to try harder in the final and get the braking right.

The final came and went and I gained almost a second over qualifying but the car felt even less powerful and with worsening braking problems. I put it down to my overeagerness to late brake until I came to the final lap and I lost the brake pedal altogether and cruised into the pits to see fluid leaking all over the wheels and tyres. This was why the braking lockups were happening. Turned out to be the union pipe that joins the two caliper halfs on the drivers side - the nuts had come loose and were dripping fluid. I have spoken to ksport about this and they have now added a bolt check into the install instructions (i hadnt checked mine and I guess the heat cycles had done it).

At the end of the day I felt a little disappointed about my competitiveness in the new class even though I ended up 3 seconds quicker than last year, the car handled superbly on the new BC coilovers and felt very nimble through the corners - the lack of weight now is very noticeable which was very pleasing and the cage made the car feel tight.

After the event and on driving the car on the tuesday up to Leeds (daily driver duty) the boost leak was obvious with only 0.7 bar available and lots of hissing - the noise i heard on saturday on track was obvious now. Split pipe from turbo to IC:

Image

Very annoying that I didnt spot this on the day as it now explains why my speed traps were falling during the day despite carrying more speed through the corners. On the main speed traps, i was 10mph slower at the end of the day than I was during the warmup. If only ..

Anwyay, all fixed now and other finishing work done on the work that couldnt be done pre oulton and almost ready for knockhill with full power and full braking :thumb:

Other items done:

- central aerocatch for bonnet:
Image

Image

- some bling mirrors that I can see sod all out of :D :
Image

- door sealing rubbers
- window retaining clips
- engine bay is now spotless too :D

There are a few bits to sort pre knockhill next week:

- some internal wiring
- suspension alignment
- get lap timer
- remove tyres (and sell them on)
- wheels powder coated white (it just has to be done)
- fit new 888's

And that is it :thumb:

PostPosted: Mon May 03, 2010 6:45 pm
by Chris B
Car is looking really good Duncan.

PostPosted: Mon May 03, 2010 7:41 pm
by rocko
Fair play dude .. Car looks sick ... 8)

PostPosted: Mon May 03, 2010 10:51 pm
by WR1 Bro
rocko wrote:Fair play dude .. Car looks sick ... 8)


innit

PostPosted: Tue May 04, 2010 7:41 am
by WR 1mposter
WR1 Bro wrote:
rocko wrote:Fair play dude .. Car looks sick ... 8)


innit


sweeeett

PostPosted: Tue May 04, 2010 5:25 pm
by Azyman
WR 1mpostor (aka number 1 moderator) wrote:
WR1 Bro wrote:
rocko wrote:Fair play dude .. Car looks sick ... 8)


innit


sweeeett


No What i mean :D

PostPosted: Sun May 30, 2010 8:10 pm
by dynamix
So... I had a busy day yesterday and pulled the engine out of the scooby after the issues at knockhill. It was planned for a refresh anyway as 20,000 miles since last rebuild and it was needed. Compression was down so there was a definite need to do it now rather than later.

Image

out ..

Image

mostly stripped ..

Image

Not looking great with what looks like bore damage on 2 & 4 from ringlands or rings.

No other issues identified so far with no sparkle in oil or anything else but need to get the pistons out to study the damage to be sure what happened.

The plan is to rebore to 100mm and fit a nice new set of cosworth 100mm oversize pistons and new bearings and put it together next week or two ready to run in for 27th at Brands. Got plenty of time to make sure everything is spot on and clean.

No other major changes are planned but there will be some tidy up of wiring and pipework to make the engine bay tidier. There will also be a revision to the Zen Dry Sump with a custom oil tank to replace the temporary item that we put in last october. This will sit much lower in the car and hold a significantly greater volume of oil. There hasnt been a problem with the dry sump as it is but this has always been the plan by me and Paul at Zen to give it a bigger volume of oil and some revisions to the design of the oil pump from the early development version I am running to one that allows some on the fly changes to oil pressure valving.

PostPosted: Fri Jun 11, 2010 6:44 pm
by dynamix
rear pistons out and they aint pretty lol

3 has a bent ringland beneath the top ring which was probably stopping the free movement of the ring.

4 is erm ...

a little worse for wear LOL

Image


Update on engine is that it is completely stripped now and damage is as follows:

- bore damage on 2 and 4
- all four pistons damaged in some way

Everything else is tickety boo including big end and main bearings.

Dropped the block today over at Knight Engineering near northampton for them to rebore and fit a new liner to bore 4 as the damage to that wont quite bore out. Gave it to them with the spare liner from Paul at Zen and a new cosworth 100mm piston which will be going into the build.

They will also be cleaning the block up so it will come back spangly new. The aqua blasting works really well but it will need to be very carefully cleaned afterwards quite a few times to get rid of the material. Hopefully the rebuild will commence next week when the block comes back.

Whilst the engine is out I have tidied up the engine bay and cleaned/sprayed it to make it neater. It has also been a good time to re-route some of the hoses and finally fit the fuelab prodigy fuel pump :thumb:

FMIC pipes have also been powder coated gloss black to make them much easier to clean than the wrinkle red - this was done by two borthers coating in sheffield and they did a great job :)

The APS cold air induction kit I had fitted ages ago has also gone as it fouls slightly on the much wider wheels so have gone with the roger clark large trumpet filter and cone within the engine bay.

Afraid no pics at the moment as I am saving them til sorted and back in.

===============================

More tidy up jobs .... whilst waiting on the block halves to come back so that I can start the rebuild.

Fitted Perrin 25mm front ARB and drop links. Replacing classic whiteline 24mm (fitted upside down !!)
Fitted Fuelab Prodigy Fuel Pump - should do the job perfectly :D

Image

Re-routed fuel pipework ready for fuel filter to be added
Re-routed Oil Cooler pipework and shortened them (they were far too long)
Tidied all wiring.
Tidied loom.
Cleaned and sprayed the engine bay to make it look more presentable.
Adjusted suspension castor.
Added some sound proofing and heat insulation to the engine bay. yes I know this goes against the grain but I was getting very hot in there in scotland, let alone what brands will be like in the hieght of summer. Also it was just too noisey and I was having trouble hearing the early feedback from tyres/brakes... Having looked at some of the GT2 cars alot of them have this so DEI heat shield acquired and applied:

Image

Also wrapped the headers and up-pipe again (god i'm itchy now lol) cos heat wrap just falls off after a while.

Everything is now clean and ready for an engine to go back in and all engine bits cleaned, polished and ready for assembly.

15 days to go !

PostPosted: Fri Jun 11, 2010 7:20 pm
by rocko
Nice dunx ... love to see projects like these ..

Not many on here ...

Any other changes to the engine or just a refresh Build

PostPosted: Fri Jun 11, 2010 8:32 pm
by dynamix
rocko wrote:Nice dunx ... love to see projects like these ..

Not many on here ...

Any other changes to the engine or just a refresh Build


maybe see if i can sneak a little more power ;)

PostPosted: Wed Jun 16, 2010 1:18 pm
by dynamix
ok latest news... and the plan after a huge disappointment on monday being told that the existing block could not be relinered with the liner I supplied. After ringing all and sundry, the only option was to order a new liner from darton in the US but that would take 20 days min. Not an option.

Also contemplated boring out to 101mm and getting some custom pistons - again not an option in the timescales.

Also contemplated running 2.1 stroker in a CDB block or even just nailing a std ej257 casing in there and hoping for the best but neither of these engines are what I want in the car so were dismissed on the basis I didnt want to spend money on something just to get me through Brands.

So.. Mark at Lateral to the rescue with a damaged EJ257 set of block halves and Paul at Zen with some darton liners that I could then get to the machine shop for them to mate the two together. Thanks guys :thumb:

I picked up the block yesterday from mark and dropped the block and liners over at the machine shop this morning and they will be machining the block to take the ductile steel liners, then flatting the tops of the bores to be ready for the rebuild.

I will pick it up from them on wednesday next week and then go to zen to hone to block to take the new cosworth forged pistons (standard size) and bring all back to mine wed evening to start cleaning it all up (sorry in advance for the mis-use of the dishwasher rachel ;) :lol: ) Also picking up the new dry sump pump, bits and custom tank.

Thursday - build starts. This will take all day (and probs late into evening too or maybe next day gulp)

Friday - Test fit dry sump tank into empty engine bay then slot new engine in and bolt everything up ready to fire up late friday.

Saturday - run it in and map it on the new fuel (probably while driving it down to brands in the late afternoon)

Fingers crossed there are no gotchas cos there is no room for movement in timescales :(

Anyway, it will end up a very strong engine with Lateral internals, ARC race shells and will be good for 700bhp + should I need it. I will continue to run on the MD321V though for this round at least as I think it is very well suited to Brands.

The other block will wait for the custom darton sleeve and will get readied for selling on as a 700bhp capable 2.5 engine.

PostPosted: Sun Jul 25, 2010 6:42 am
by dynamix
It lives !!!

Despite some dramas that night and again the following morning with oil pressure dropping like a stone to zero once started up. The pressure relief valve was sticking and huge thanks to Paul and Liz for calming me and arranging replacements at VERY short notice.

Image

I have now got 250 running in miles on it and all is good.

I took it on the dyno at zen yesterday so that I could check the map on vpower to make sure all was ok. Thought it would be rude not to do a power run and was very surprised with getting 497bhp at 1.6 bar on a VERY tame ignition timing map. This is my best result ever on std fuel and was quite exciting. Hopefully it will be over 600 on proper fuel and timing.

How it looks at the moment :

Image

Image

Image

Image

PostPosted: Sun Jul 25, 2010 11:43 am
by rocko
Looking awsome .. Again duncan ...

I hopin to see it in the flesh when i get around to attending to a event again ...

Might even try blag a siteing lap with you ... :D